Iron red glaze recipes and Tenmoku for Cone 9.
I must firstly apologise to my non-potting readers, this post will be mostly glaze stuff.... recipes and the like! However, there will be pictures! And you might like a bit of a look into the contents of my glaze bucket... seeing as we've been friends this long!

PTM
Potash Feldspar 41
Ball Clay 13
Silica 13
Talc 10
Bone Ash 13
Red Iron Oxide 10
+ Dolomite 11
+ Lithium Carbonate 2
The glaze I know as PTM had its beginnings in a Mike Bailey and David Hewitt recipe that appears in the book, "Clay and Glazes" (edited by Emmanuel Cooper and Eileen Lewenstein). My potter friend, Peter W. had experimented with it a few years back. Peter rounded up all the numbers in the recipe, and accidentally added some dolomite to his test. The result was very promising, and better than the original, so he did a series of tests with increasing amounts of dolomite. I always loved the look of the glaze tests that he did, and borrowed Peter's recipe and tried to replicate Peter's results. My tests looked, OK, the glaze was very nice, but were missing something, and I started to suspect that an addition of Lithium Carbonate might help. A visit to Peter W. confirmed that the original recipe should have had Lithium Carbonate in it. A further batch of glaze was made up, and the tests with added Dolomite and Lithium look very nice indeed.

What I like about PTM, is it is a little "wild". It moves and changes colour as it goes from thick to thin. Throwing rings show up well, and close to, or under magnification, the colour is very complex, showing flashes of plum, tomato, blue, orange, and brown.
I also tested Bailey's Red, that I found in John Britt's excellent book, " The Complete Guide to High-Fire Glazes". Only just now, as I am writing this, do I realise how closely the recipe resembles PTM. The result is quite different though, both in colour and in character.

Bailey's Red
Custer Feldpar 47 (I used potash feldspar)
Silica 13
Kaolin 13 (I used ball clay to help lower the maturing temperature)
Talc 10.5
Bone Ash 14
Lithium Carbonate 2.5
Red Iron Oxide 8

Bailey's Red is a lovely glaze, the gloss is even, the colour even too. It is quite interesting up close, being made up of green and red flecks, a bit like looking at a pointillist painting done in two colours. I can see that the red would develop better if the glaze were thicker. The other thing that would almost certainly improve Bailey's (and probably PTM) would be a temperature soak at about 950 degrees Centigrade (1742 F) as the kiln is cooling. This would give a chance for some of the iron to re-oxidise. In the case of Bailey's this would result in less green flecks and more red.
Whilst I think about it.....
Some Recommended Reading.
I have recently been reading all sorts of useful things about the use of iron in glazes, and, for those wanting more understanding of such things, I recommend a look at this article from cone 6 pots iron glazes and achieving red.
Other experiments in this firing were with tenmoku glazes.

One was a Black Tenmoku that I have used when firing to cone 11 or 12 in my wood fired kiln, but have not done much with at a humble cone 9 in the electric kiln.
BTM
Talc 15,
Wolastonite 15,
China Clay 10, (I used Ball Clay)
Silica 15,
Potash Feldspar 55, (I used Nephaline Syenite)
and red iron oxide 8.
Substituting Nephaline Syenite for the Potash Feldspar and Ball Clay for the China Clay should drop the maturing temperature a little, and this is what I tried.

At cone 9 the modified glaze had a satin gloss, that actually was rather nice, but it did not develop its full black and really wanted some more heat to do so, or needs a further adjustment of the recipe. I also tested this glaze with iron sulphate in place of iron oxide. Iron sulphate has the lovely name, crocus martis, and I wanted to compare it side by side with iron oxide in a glaze and see if I could detect a difference.

There is one, and it is very subtle, and I find myself preferring the glaze that contains crocus martis, there is just a hint more warmth, and the beginnings of a red/brown change of colour where the glaze is really thin. I also tried the glaze with half the amount of iron, 4 percent, to see what colour that would give, and was rewarded by a yellow-green brown.
I also fired something that a recipe Peter W. had as Red Tenmoku.

Not really sure why it gets the name "red" as the glaze is a very dark brown to black usually. This matured very well at cone 9, and is a very presentable dark brown glaze with a slight reddish "break" at the rim of a mug where the glaze is thin.
Red Tenmoku
Potash Feldspar 50
China Clay 10
Whiting 5
Dolomite 15
Silica 30
Red Iron Oxide 8
Both the black and the red tenmoku glazes are good candidates for use as an under-glaze when doing chun type glazes.
Footnote...
Tenmoku, Temmoku, there are various spellings for this glaze. As to the meaning of the word, "the eye of heaven" is the meaning that I have heard most often, but I will leave you with a link to a site that has several more explanations of the word... Tenmoku meanings.
Errata..... I tried to post a little video on this, but had to take it off again as the sound got messed up "somewhere in the cloud"!

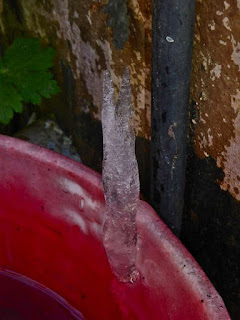
PTM on a pot!
PTM
Potash Feldspar 41
Ball Clay 13
Silica 13
Talc 10
Bone Ash 13
Red Iron Oxide 10
+ Dolomite 11
+ Lithium Carbonate 2
The glaze I know as PTM had its beginnings in a Mike Bailey and David Hewitt recipe that appears in the book, "Clay and Glazes" (edited by Emmanuel Cooper and Eileen Lewenstein). My potter friend, Peter W. had experimented with it a few years back. Peter rounded up all the numbers in the recipe, and accidentally added some dolomite to his test. The result was very promising, and better than the original, so he did a series of tests with increasing amounts of dolomite. I always loved the look of the glaze tests that he did, and borrowed Peter's recipe and tried to replicate Peter's results. My tests looked, OK, the glaze was very nice, but were missing something, and I started to suspect that an addition of Lithium Carbonate might help. A visit to Peter W. confirmed that the original recipe should have had Lithium Carbonate in it. A further batch of glaze was made up, and the tests with added Dolomite and Lithium look very nice indeed.

Close up of PTM with a little brushed on swirl of dolomite and water that provides extra fluxing.
I also tested Bailey's Red, that I found in John Britt's excellent book, " The Complete Guide to High-Fire Glazes". Only just now, as I am writing this, do I realise how closely the recipe resembles PTM. The result is quite different though, both in colour and in character.

Bailey's Red fired at cone 9.
Bailey's Red
Custer Feldpar 47 (I used potash feldspar)
Silica 13
Kaolin 13 (I used ball clay to help lower the maturing temperature)
Talc 10.5
Bone Ash 14
Lithium Carbonate 2.5
Red Iron Oxide 8

Close up of Bailey's Red.
Whilst I think about it.....
Some Recommended Reading.
I have recently been reading all sorts of useful things about the use of iron in glazes, and, for those wanting more understanding of such things, I recommend a look at this article from cone 6 pots iron glazes and achieving red.
Other experiments in this firing were with tenmoku glazes.

Dud mugs make great glaze testers.
BTM
Talc 15,
Wolastonite 15,
China Clay 10, (I used Ball Clay)
Silica 15,
Potash Feldspar 55, (I used Nephaline Syenite)
and red iron oxide 8.
Substituting Nephaline Syenite for the Potash Feldspar and Ball Clay for the China Clay should drop the maturing temperature a little, and this is what I tried.

BTM with red iron oxide.

BTM with crocus martis.
I also fired something that a recipe Peter W. had as Red Tenmoku.

Red Tenmoku.
Red Tenmoku
Potash Feldspar 50
China Clay 10
Whiting 5
Dolomite 15
Silica 30
Red Iron Oxide 8
Both the black and the red tenmoku glazes are good candidates for use as an under-glaze when doing chun type glazes.
Footnote...
Tenmoku, Temmoku, there are various spellings for this glaze. As to the meaning of the word, "the eye of heaven" is the meaning that I have heard most often, but I will leave you with a link to a site that has several more explanations of the word... Tenmoku meanings.
Errata..... I tried to post a little video on this, but had to take it off again as the sound got messed up "somewhere in the cloud"!

Comments
And the temmoku another favorite.
Years ago in a small hard brick kiln we had we use to get the most wonderful black with green flecks- I loved it but the public was not as warm on it and we ended up with our black and blue combo.
Can't wait to see more.
I am thinking of making an above ground pit kiln with cinder blocks and want to build a small wood fired kiln one of these days, we have the room and folks give wood away for free around here. For the wood kiln I'd like to build it up like the one you use for your raku to I don't have to bend over to load it. Hopefully this summer I'll get at least the pit done since I already have the blocks. I saw a pit fire like that on a you tube and thought a good idea. I do miss the reduction glazes whenever I see your posts Peter. Have a good one.
I'll have to give these a try
I really am going to sail across to NC, there would be so much to talk about!! Very early days for me as far as my own efforts with iron reds goes, but I love the few examples that I have seen. I was thinking that iron reds might need lots of heat to work at all, but this, thankfully, appears not to be the case. I have a strong suspicion that a really fine tenmoku might need it hotter though. The influence of hard brick and slow cooling on glazes is interesting too. My wood fired kiln definitely improved over time too, probably as a result of a slow build up of natural ash glaze on the bricks.
Hi Linda,
I'm missing reduction glazes too a bit, the ones on this post were all oxidised in the electric kiln. One thing I liked about the one in the first photo was how like a "real" stoneware glaze it was, both in complexity of colour and in feel. If you ever do cone 9 in your kiln, you should try it sometime.
The pit firing idea sounds great, and I hope you get that done. It would be really nice with some of your work. It is always good to be able to do something with some real smoke and flame!
Hi Patti,
That's so sweet! xxx!
Hi Gwynneth,
I have one without Li that I used with success in the past at cone 10 and above, it gave a strong orange red with a darker break. You might just get it to work at the cone 9 flat that you fire to if you put it in the hottest part of your kiln.
Soda Feldspar 50
Silica 20
Bone Ash 10.5
Whiting 6.5
Ball Clay 7
Talc 6
Red Iron Oxide 11
I fired it both in the electric kiln and in the wood fired, with both OK, but wood fired better with some plum like purple tones improving the orange-red.
Not sure if your wish to do without Li is a health and safety thing, or if it is the cost... (both significant worries in this house-hold!). I want to try redoing the glaze using Petalite to replace some of the feldspar and all of the lithium. Petalite, being a feldspar like rock that contains some lithium, it minimises any risks associated with handling lithium carbonate and could be a nice way of achieving similar results.
Edouarde Bastarache from Quebec has recipes on his blogs too. I tried one last firing (on the small cup and saucer, I think I posted a picture of it.)not what I expected, but worth trying again!!
http://ironreds1.blogspot.com/
he has different blogs for different colours!
He is on clayart and is a good source of information and help.
I did try your chün on some bowls, and I realy would like to change my kiln because it slows down too quikly. The test was very good, the bowls show many little pin hole, as on my glazes, when applied thick.
Best wishes to you, Laura and the four legged companions
Lovely to hear from you. Where would I be without the good cheer and kindness of Pat and Patti from Arkansas! You both make life so much better. xx
Bonjour Armelle,
I say this with grey circles around my eyes... as I have been up every two hours through the night firing the electric kiln, which seems to be having more and more in common with your one! My one really needs encouragement!
I also worry about some glaze materials, and I will try some further tests with PTM to see if I can get it to work nicely with petalite or lepidolite, or spodumene, as these minerals all contain some lithium, but would be much safer to have in the house than refined lithium carbonate.
I wonder where those pin holes are coming from? They may be due to gas from a glaze material or - most likely - from something in the clay that the pot is made of.
Here are some suggestions for getting rid of pin holes. You may well have thought of these already, but this might help someone! (Other potters reading this my have some ideas to try, and are welcome to send them in.)
If you can hold the peak temperature for 15 minutes to allow some time for the bubbles to stop and to heal over.
You could also try "firing your kiln down" if you think that the temperature drops too quickly after the kiln has switched off. To do that you just switch on the kiln again and select a low setting. Keep it on low for the first half hour to an hour after it has reached the peak temperature, and the kiln will cool more slowly.
I also wonder if you might solve the pin holing problem at the bisque firing stage? Try firing the bisque firing slower, especially between 800 to 950 degrees Centigrade to allow more time for all organic matter to burn out of the clay.
Laura says "Hello" and the four legged companions send purrs. NS hid a dead mouse in a box, and a dead bird... I think that Ginger caught the mouse for her.., I have seen him do this!
Et merci beaucoup pour tous vos conseils. I will try them all and do my best. I did add some "Alun de potassium" (potassium alum)in your recipe, as I use to do in all my recipes and perhaps !!! that changes all the effect ??? Your chün is really better on grog clay, as my others glazes. I bisque fire at 980°.
Ce soir j'étais sur le marché de Bangor et j'ai vendu un vase :-)
Bonne soirée à tous
I whish you many encouragements for your kiln, and : j'espère que les cercles gris autour des yeux iront mieux :-)))
Bonsoir Armelle (and it is evening here too! All dark outside!). Thank you for your comments. I delighted to read that you have sold a vase at the market, that is lovely,and I am so pleased for you.
Are you using the Alun de potassium to help the glaze behave better in the glaze bucket (suspend better in the water and not form a hard lump in the bottom!)? Or are you using it as an additional flux?? I am sure that it is harmless in small amounts to help suspend the glaze, but might affect things if you used lots of it.
Kind Thoughts, and Congratulations on your lovely pots! P.
Good to hear from you. The clay for that pot was almost certainly Southstone made by Southern Clays Dunedin NZ. The glaze also works well on Southern Clays Stoneware. I am not sure if you will have access to the same clay as me, as I don't know if you are writing from NZ or a different country, but Southstone is a fairly sandy, open,stoneware clay that, I suspect may have a fairly high amount of iron and other "goodies" in it. The Southern Clays Stoneware is less sandy, and may also have a little less iron in it (I am guessing here), but is not a "white" stoneware clay.
I suspect that you should have good results over many stoneware bodies with this glaze, and you will need to fire to about cone 9. For best results it would be worth experimenting with a half hour soak at about 950 degrees C (1742F) as the kiln is cooling.
Keep the glaze fairly thin in bottoms of bowls, as this glaze does move a bit and will tend to collect in the lowest part of a bowl. If too thick, this can become a bit ugly.
Do let us know how you get on with the glaze.
Best Wishes, P.
Larry Coffey
Thank you so much for your comment, I am delighted that PTM has worked well for you, the combination with Nuka sounds a great idea. I would be really pleased to see a photo of the mug, so do email one to me. opogallery AT gmail DOT com (with the normal changes to the AT and DOT) should find me. I might be able to add your photo my my high fire glaze recipe page as an example.
Best Wishes, P
Thanks!
I'm still receiving messages loud and clear! Thank you for writing in. All the glazes on this blog post were fired in the electric kiln at around cone 9, sorry for any confusion! Whilst the other glazes on this post are very happy at cone 9, the BTM glaze definitely improves with more heat than that. I regularly use that one as a liner glaze inside my crystalline glazed pots that I usually fire to cone 10 half down.