Making a large plant stand, one kilogram at a time!

In the past I would regularly make pots from 3, 4 or even 5 kilograms (5.6 - 11 lbs) of clay on the potter's wheel without any worries of straining something. Centring was not a problem, and I enjoyed the physicality of working large. After a shoulder injury the "landscape" changed dramatically, and I found new enjoyment and satisfaction in learning what could be done with 750 grams or so. That left me with a problem, how could I complete larger commissioned work? Some commissions I let go, but I was determined to find a way of making some plant stands that had been ordered, these were to be quite large, and each would require several kilograms of clay.
One day I happened to see a Youtube video of a Korean potter throwing a large bowl of around 16 inches (40 cm) in diameter on a traditional wooden wheel. The wheel looked a bit like a two tier wedding cake with the wooden wheel head supported on four wooden posts above a lower wheel of a similar size that was designed to be directly powered by the potter's foot. The wheel would have had very little power or momentum, but this skilful potter was able to make large work by a combination of coiling and throwing clay. I was fascinated and impressed.
I have used throwing and adding coils and throwing some more myself for large work, but would usually start with 5 or 6 kilograms (11 - 13 lbs) of clay, throw as far as I could with it, then complete the pot with 2 or 3 coils of clay that were added and thrown. The Korean potter started coiling almost straight away.... and this got me thinking!
A few days later I tried making a plant stand, one kilogram at a time.
I had to make several plant stands, so I thought I would take some photos as I made one of them.


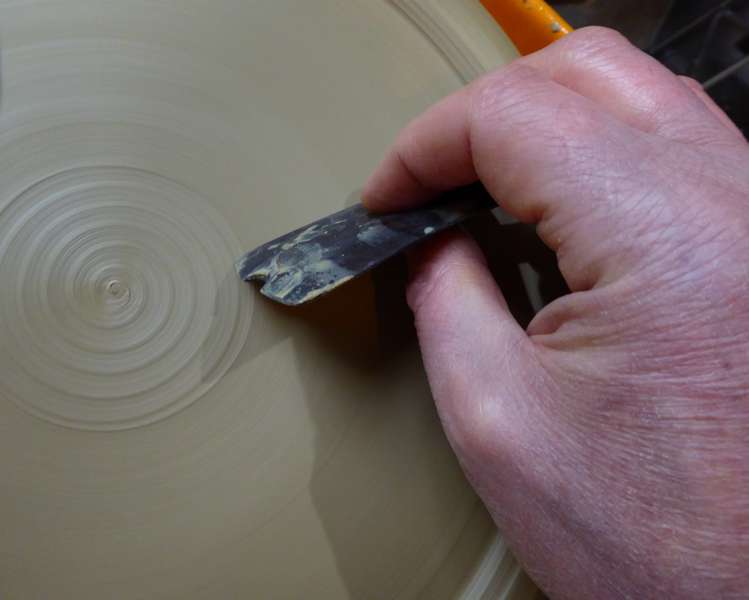


I am working on this pot stand with it upside down, so this edge with form the "foot" of the pot stand.


I finish this decoratively by forming a ridge.
Two days later, when leather hard, I was able to cut out areas with a wire, and add decoration with clay stamps. Then I turned it over, added a coil of clay around the edge, and pulled that to form a rim.

Here are 4 plant stands shortly after finishing. Making each one was a slow process, but I was very pleased to be able to make at all. In fact they gave my confidence a great boost! The largest pot stand uses more than 6 kilograms of clay.
Coming up in my next post will be a sequence of photos that show the making of a large owl that I completed last week.
Soon I will be having an extended break from making pottery, because I will be having an operation on my troublesome shoulder. ACC finally approved my claim and everything has happened with considerable speed since then. The operation is scheduled for 10th October.

Comments
I met Michael Cardew when he was 77, giving a throwing demo. He made a jug in 3 parts where he used to make it in one...as he said "Why make life hard for yourself?" !
http://www.marcspotterytools.com/ is a commercial version.
Full disclosure: I have never used one and have no connection to this business, I just found it in a google search for the topic.
Good to hear from you thank you for your encouragement. Do let me know if you give this method a try, I would be interested to hear how you get on with it.
Hi Yegana,
Welcome to the blog, good to hear from you. I popped over to your website and am most impressed with your work and with what you are achieving with the classes. Lovely to see that you are getting others started with potting.
Hi Melissa,
Very nice to hear from you, thank you for your good wishes!
Hi Gwynneth,
How wonderful to have seen Michael Cardew demonstrate. He visited New Zealand many years ago and I was interested to see on wiki that his first western pupil was Peter Stichbury, a New Zealand potter (who died last year). A few years ago when I visited a collector of African pots I was fortunate to be able to hold a lovely pot that was made by Ladi Kwali,the first female potter at the training centre that Cardew ran in Abuja, Africa.
Hello Dad!
Thank you!
Hi Anonymous,
Thank you so much for writing in with such helpful information. I had not seen this way of centring clay before and it may well prove to be a great help to me in future months as I come back to potting with a repaired shoulder. I had a good look at the videos on the marcspotterytools site, and am very interested.
Good to hear from you. Ruthanne Tudball is one of my heroes. I remember reading an article about her a few years ago and was really impressed by her way of adapting technique and flourishing instead of giving up when faced with very real difficulties in life. I love what I have seen of her work in photographs, it has a joy and freedom about it that makes it look like it is still being created on the wheel! I understand that she does most of the assembly and finishing of things on the wheel too, so a teapot (for instance) might have the spout put on before the body of the teapot is lifted from the wheel. Wonderful stuff!