How Owls Are Made!
 |
| An owl "egg"! |
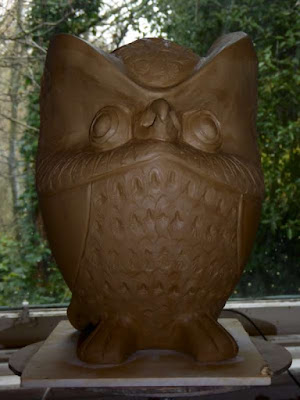
As in the case of most things concerning birds and bees, these owls began with an egg! A deep bowl was thrown on the wheel and coils of clay added, then thrown some more and more coils added until a height of 13 or 14 inches (33 - 35.5 cm) was reached. The top was carefully collared in with the hands and fingers, and closed over. A wooden rib was used to smooth the top until a pleasing continuous curve was formed. Once completed the "egg" was just over 12.5 inches high (32 cm).
Keeping one of the wooden owls near by for reference, I began shaping the face of the owl, pushing areas in for the eyes, and forming where the beak would be. I mostly used my fingers for this task, but also found the wooden rib and a flexible rubber "kidney" helped a lot.
I added slab "eyebrows" to the face of the owl.
and curved them around the sides.
I made a second wall behind the slab one to form the back of the "eyebrow". The second wall was built progressively out of pellets of clay.
The "eyebrows" were hollow inside, and I made small air holes through into the body of the owl to let out air and steam when the owl was fired. There is a large hole in the base of the owl to let steam out, and also to provide a point for the owl to be anchored when it is displayed outside.
The "eyebrows" were built progressively until only a small hole remained on top. This was filled with a small plug of clay, and the top smoothed with fingers and the rubber kidney.
The next job was making feet, eyes, and tail. The feet, and the eyes are hollow, and air holes lead through the back of the eyes into the body cavity, and there are holes under the feet.
Details were added, most with wooden tools.
Stamps carved from clay and bisque fired were used to add feather details.
I made two further owls. Each started with a clay "egg", but I did vary the method of making the "eyebrows". Probably the fastest and most effective was to make the eyebrow solid from pellets of clay, then hollow them out from the top using a wire loop tool.
The owl on the left of the photo was the last one made. I turned the "egg" upside down after making it on the wheel, and used the "foot" of the "egg" to make the head of the owl. This gave the owl a better body shape than the larger owl with centre of mass somewhat lower.
So there you have it, a little introduction as to how owls are made!
Coming up Soon!


Comments
Thank you for explaining the engineering required for that shape, too.
The firing of the owls will be a few weeks away, things are still quite cool in my studio and I'm drying them quite slowly in the hopes of avoiding cracking. All looking good so far!
I quite liked the owls early on when I was making them when they were still a simple oval shape with indentations where the eyes would be. The ones you saw at the Japanese garden sound nice, I hope you do have a try at an owl yourself!
Is your op tomorrow?
If I an correct, I wish you well.
We are going to be in Dunedin mid December and I think it is the 15th that I hope to get up to see you.
Go well Peter
Bob S
Kind of you to remember the operation, yes... I'll be having the operation early tomorrow afternoon if all goes to plan, and should come home Tuesday. We've just been in Dunedin doing the pre op stuff and a big supermarket shop (mostly for cat food!!) to help us through a time of being semi marooned here until I can drive again. It will be so nice to catch up with you both in December when you are down this way, we're looking forward to it.
Best Wishes from us all down here, Peter, Laura, and Nigella Stopit!
I greatly appreciate your comments, but I might be a little slow getting round to responding to them after this point as I am due to be having surgery on 10th October for a shoulder problem. Apologies for any delays! Peter
I haven't been able to fire them as yet as they have been drying on a high shelf and I can't get them down until my shoulder is a bit better! The good thing is that they will be nice and dry when they are fired. I hope to put some photos on the blog when they do go through the kiln.