Back in the mists of time, when I last posted I did promise to upload some photos and information about the kiln and how it works. The kiln is rather unusual, but is showing signs of working very well, and I do hope that some of the design ideas might help someone else to make a kiln.
I think that the ladder type grate shows a lot of promise, and may well make a very welcome alternative to someone who has battled with a more conventional design. The other refreshing thing for me was to find that the single firebox with entry flue at the back left hand corner made it perfectly possible to have an even heat distribution front to back in the kiln, and only a 2 cone variation from top to bottom. Having the shelf over the firebox may help with this, and it is certainly a useful "bonus" place to put an extra pot or two in the kiln.
 |
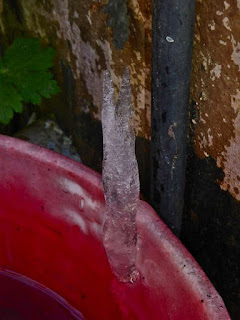
| Chamber with front shelf removed to show flueway to chimney under shelves. Inlet flue is visible at the left rear of the chamber. |
|
 |
| Loading kiln. Back shelf stack full, front stack incomplete. |
 |
| Loading kiln. Front and back stacks of shelves full. |
 |
| Chamber door bricked up 6 inches thick with 2 layers of insulating fire brick on edge. |
 |
| Fire box door in place. Small fire lit under ladder grate at beginning of firing. |
 |
| Chimney damper on left used to control the draught through the kiln. Right side of chimney no longer in use since alterations to the chamber. |
 |
| Kiln in daylight with metal drum of kindling rather blocking the view! |
 |
| Kiln firing at night. The first firebox door was an old ceramic fibre lined dust bin lid! |
In February of 2017 I demolished the external firebox and stripped out the interior of the kiln. The following are photos that I took of the rebuild.
 |
| Kiln stripped out leaving arch and back up insulation bricks. |
 |
| Floor of chamber was made on a foundation of concrete blocks that are laid on their sides. |
 |
| The chamber floor consisted of one layer of standard fire bricks over a layer of insulating fire bricks. On the left the firebox is under construction. |
 |
| The floor of the ashpit is two fire bricks thick to help protect concrete foundation slab from excess heat. |
 |
| The actual floor of the firebox has an air gap under it. I used some large second hand fire brick slabs to make this floor. |
 |
| Fire box nearing completion. Large fire bricks make a ladder grate. |
 |
| Firebox from the front. "Ladder" just visible. |
 |
| Heavy large fire brick slabs form the top of the firebox. |
 |
| Relining the chamber side walls and back wall is complete and the permanent left hand front wall is under construction. |
 |
| The left side of kiln almost complete. Concrete blocks that are under the chamber will be left "open" so that any build up of heat inside them is allowed to escape. |
 |
| A kiln shelf covers most of the firebox inside the chamber. A gap is left in the rear corner to form an inlet flue. I initially thought I would use a single stack of 18 x 24 inch shelves in the chamber, but decided that 2 stacks of smaller shelves would make stacking the kiln considerably easier, the shelves less likely to bend or break, and offer more versatility. |
Hope the photos have been of help to someone. Apologies if they have been rather slow loading due to their quantity, but I thought it useful to have them all in the one place.
I am happy to try to answer any questions regarding this kiln, but do regard what I have made as a starting point! The shape and size of the kiln was dictated to some extent by the kiln shelves and other materials that were available to me. You may well have other materials on hand, so could build quite differently.


Comments
Good to hear from you. It was a pleasure to finally get the photos into some sort of order!
Trust you are keeping warm as I think you had some fierce winter storms this year.
It is nice to hear from you all the way from sunny Australia! We started unusually warm this morning, but the sky is now grey and it is much cooler. Some talk of a thunder storm this afternoon! In our recent big storm the main road about 200 meters North of us turned into a river, and 2 or 3 houses were flooded. Our side street also was under water, but we sailed through it all on a little "dry" patch of land rather like Noah's Ark!
Thank you for sharing this post, that is much appreciated. I think that people may have assumed my blog had finally ground to a halt lately, as I haven't posted as often as I should have... but we are still here!!
thanks
Kimberly
Good to hear from you, glad you enjoy this blog, sorry it has been a bit "quiet" for a while, I really must get back into the habit of regular posts!
Regarding the cost of building the kiln, it is a bit difficult to work out as it has "evolved" over a long period of time. Over all, it has probably swallowed up NZD $8000 - $9000, but could have been done for substantially less if I had started with a more straight forward version of what I have now. Currently the kiln has quite a lot of unnecessary structure that is left over from earlier versions of itself (such as the chimney being twice as wide as it really needs to be).
Insulating Fire bricks and other building materials are very expensive in NZ, sometimes twice as much as they are in the US for example (new kiln shelves can be 3 times the price here!!!) so you will very likely build something for a lot less than this if you live in US or UK. Regular heavy fire bricks may be able to be purchased second hand, but insulating bricks are often very fragile after they have been in use so are probably best obtained new.
Hope that is of help.
Still if we lived where we could have a kiln like this we wouldn't have a bus service, local shop and doctor's surgery, etc etc !!
Life is quite a balancing act! We do still manage to have the things you mention in our village, but..... only just! I do wonder how long I will get away with having such a kiln, but I do manage to keep smoke to a minimum and think that few people would ever be aware of it when it is fired.
Sincerely George
Welcome to this blog, it is good to hear from you. I will have a think about wood fired kilns and reply tomorrow sometime with some information for you.
Kind Regards,
Peter
It is possible to build a small wood fired kiln from about 300 ordinary red house bricks and a few other demolition type materials that will fire to 800 or 900 Celsius which is enough to low fired raku pottery. Some fire bricks (the pale yellow ones that are designed for high temperatures) would mean that you could build a small kiln for much higher temperatures.
When I became interested in the idea of firing with wood I did not know any potters with a wood fired kiln, so I just had to read books and magazine articles about pottery and kilns and do some experiments on my own. I used second hand bricks for my first wood fired kiln, and it was very small with a chamber for the pots that was only about 1 cubic foot in size. Much to my surprise the kiln got to about 1100 Celsius in about 2.5 hours. I could hardly believe it, that wood could provide so much heat! I am glad I started with the small kiln, and I learnt a lot by building kilns and trying them out. The second one I built did not work at all, but all the other ones got to at least 1000 Celsius. My 5th kiln worked really well, and number 6 was my first serious kiln with the chamber for the pots about 1 cubic metre in size.
I put a plan on my blog of a small wood fired raku kiln that was similar to the first kiln that I built. Something like this would be an ideal starting point for you. http://opopots.blogspot.co.nz/2009/10/raku-kiln-for-armelle-getting-pots.html
This kiln makes use of some old kiln shelves to make the Chamber floor and the kiln roof, but it is possible everything out of brick if you only have that available.
Please do keep in touch and ask any more questions if you would like more help.
Best Wishes,
Peter
Thanks.
George
What about single firing. Do you accept it? What kind of glazes are used for single firing, or it's just regular glaze?
George
Most of my work has two firings, a bisque and a glaze firing, but I have also occasionally experimented with single firing.
The glaze that is applied to a single fired pot has to match the shrinkage of the pot as it dries, otherwise the unfired glaze may crack and fall off the pot before it is fired. Some people say that you need a lot of clay in a glaze recipe for a single fired pot, but this is not necessarily true. Regular glaze recipes can often be modified to make them work well for single firing. Adding 3 to 5 percent bentonite to a glaze recipe, and/or using ball clay instead of china clay (kaolin) in a recipe, may be all that is needed to help the glaze match the shrinkage of the drying pot.
It may help to glaze the inside of the pot when it is leather hard, let the pot dry overnight, then glaze the outside of the pot. Spraying the glaze onto the pot may give more chance of success.
Firing a single fired pot starts off slowly like a bisque firing. Once past about 1000 Celsius then a single firing can proceed as fast as a regular glaze firing.
There are two books on single firing that I would recommend, I think both are available on Amazon.
The first is quite a short book with good easy to understand information and good photos.
https://www.amazon.com/Single-Firing-Pros-Ceramics-Handbooks/dp/0713639024
The second is a longer book that also talks about building waste oil fired kilns. A Potter's Guide to Raw Glazing and Oil Firing by Dennis Parks The book is probably only available second hand.
https://www.amazon.com/gp/offer-listing/0684163926/ref=tmm_hrd_used_olp_sr?ie=UTF8&condition=used&qid=&sr=