Wood Fired Kiln Revisited!
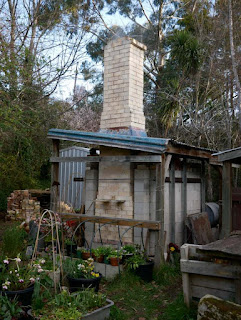
I fired the wood fired kiln recently, almost a year to the day after the previous firing. I hadn't realised that the kiln had been quiet and cold for such a long time. Quite a lot had happened to the kiln in its holiday slumbers, as I made major changes to it late last year, rebuilding the inside of the chamber and making a new firebox.
At the time I was doing most of the work on it I had hoped to have fired it before Christmas, but "life" conspired to prevent this, so maybe I should be celebrating Christmas right now... this late in the year, having completed the firing at last!
The changes to the kiln were really substantial ones, so rather than fire to 1280 C (2336 F) stoneware temperatures first time around, I elected to load up the kiln with unglazed earthenware planters and small flower pots, and aimed to fire to Cone 1 which is about 1140 C (2084 F).
I arranged the kiln with top, middle and bottom shelves, and expected there to be a temperature variation from bottom to top of the kiln. Usually, when loading a kiln like this I would place baffles on the lower shelf that would direct the flames higher in the kiln before finding their way to the exit flue, but with this test firing, I kept things simple and mostly just loaded pots on the shelves, so that I could get a better idea of the natural flow of the flames around the chamber so as to have a better idea of how to correct things in subsequent firings. I placed pyrometric cones on each of the shelves to give me a record of temperatures reached throughout the kiln.
All my previous kilns and the earlier versions of this one, had either conventional grates in the firebox or fire boxes, or ladder type grates. The biggest change this time was building a Bourry type firebox.*
These are rather like a hopper that is loaded from the top, and are to some extent self feeding once loaded with wood. The air passes through the stack of wood. And the wood preheats before burning from below with the flames passing through to the chamber of the kiln where the pots are. In theory a Bourry box firebox should be far less labour intensive to fire than a more conventional type that has a grate, as the wood just needs to be replenished by the armload from time to time from the top, rather than having to continuously feed a hungry fire with two or three pieces of wood every 2 or 3 minutes for hours usually whilst kneeling or bending!
There were lots of unknowns with the new firebox, I did not know if it would be sufficient, or if it would be overpowered and hard to control. An additional challenge for this firing was that majority of the pots were completely unfired, and some were moderately large and heavy, so I would need to control the early part of the firing with great care to allow any moisture to steam out of the pots without blowing something up!
I took two days to carefully load the kiln. Once the chamber door was bricked up and the kiln made ready to fire, I lit a very, very small fire in a little temporary extension to the firebox that I made out of a few old bricks. It was more like a tiny camp fire, and I just directed the heat into the kiln, and very slowly brought it up to about 50 C (122 F) indicated on the pyrometer.
It was rather smoky and dispiriting work at first as the cold and damp kiln took a while to get enough warmth into its old bones before the chimney could exert any pull on the fire. The first sign of any life in the kiln was a strange grey cloud that formed at the chimney top, like a large clammy pillow. The smoke did not rise further but just sat there looking rather ominous! It took 45 minutes before the chimney started to draw with any enthusiam, but once it did everything became much more fun!
I let this fire go out and lit a similar one the following day, this one lit easily and the chimney worked right away.
The day after that I fired the kiln!
The weather was still and the temperature a healthy 4 degrees C (39 F), with just a hint of frost in some of the low parts of the garden. The sky full of stars, but birds were starting to stir and I could hear Magpies in a nearby tree try out a few notes of a pre-dawn chorus. I lit the kiln at 5.39am and was pleased to see that the pyrometer indicated that the kiln had retained a temperature of 45 C (113 F) from the gentle warming fire that I had lit the day before.
To begin with I progressively built up a fire in the ashpit of the kiln below the Bourry Box. I really wanted to "nurse" things along carefully at first because of the unfired work that was in the kiln. Four hours into the firing, with the pyrometer showing 350 C (662 F), I started to feed the Bourry box. I had no idea if this would produce a dramatic rise of temperature, or how long it would take for the fire to become established, but there were no dramas, the wood that I fed into the box, burned easily, but without causing the kiln to run away like an escaping horse. After a while I started to have a slight concern that the box was too gentle, and that it really wasn't taking over from the fire that I still kept stoking in the ash pit beneath it.
The temperature continued to rise at about 100 degrees per hour (212 F), then seemed to run out of puff as we passed 700 (1292 F). My unease about the "gentle" box magnified to definite worry! 700 degrees was so far short of where we eventually needed to be, that I started to formulate plans B, C, D as to how to proceed or at what point to admit defeat!
I thought about things, and then remembered the nice line drawing of a Bourry box that is in the pages of Bourry's marvellous book "Treatise on the Ceramic Industries" (that thanks to a good friend I have a 1901 English Edition of). The illustration shows a good pile of small logs that completely fill the box. The box has no top, and really, the pile of logs is doing most of the work of regulating the primary air to feed the fire below. I thought about my own Bourry box, and how I still had not filled it very far, but was burning no more than a layer or two of wood ... And I started to wonder if I was letting far too much air through to the fire. I decided to fill the jolly thing right up and see what happened!
The kiln responded with good cheer, and probably a sigh of relief that finally its human workmate had begun to understand what was required!
We got to temperature in about nine and a half hours. From what I could observe, the top shelf was quite a lot cooler than the lower parts of the kiln, and I had to make one of those difficult calls as to when to halt. If I continued to try for Cone 1 in the top of the kiln, then I realized that I could actually start to lose some of the pots in the lower part of the kiln, due to seriously overfiring them. I reasoned that it is always possible to re-fire underfired pots, but never possible to redeem something that has slumped and bloated, or has been melted to a puddle by excess heat!!
So I stopped stoking just after 3pm and let the fire burn out. When the temperature had dropped to 920 C (1688 F) I began to seal up the kiln with a slurry of clay slip to close up cracks that might let too much cold air in. By 4pm, with the kiln now at 850 C (1562 F), everything was clammed shut and sealed, and I was able to leave the kiln to cool.
*The line illustration of a Bourry Box that I used earlier on in the text was from the 1901 English Translation version of Emile Bourry's "Treatise on the Ceramic Industries".


Comments
Great to read your blog once more..we were beginning to worry!!
There is a small hope that we may be coming to Aotearoa NZ for your next summer...fingers crossed..base in Whanganui as before
Love your description of firing. Patience and innovation help.
Looking forward to seeing the results.
And a belated happy birthday!! Xx
Lovely to hear from you. It would be delightful to catch up with you again if you manage to head over to NZ, I hope your plans work out for you.... and thank you for the Happy Birthday!
Hi Smartcat,
It has been such a long time since I last posted anything here and it is very nice to hear from you again in spite of my infrequent posts! I'll try to get the unloading of the kiln episode out on the blog over the next few days.
Hi Charlie,
I hope that the "young housewife down the valley" grew to enjoy pottery in spite of the smuts!
Diesel certainly can be smelly, dirty stuff, but I do sometimes wish for the raw energy that the stuff has... although, when a wood fire is going well, it is a wonderful thing!
Thank you so much for getting in touch it is very nice to hear from you. It would be good to have a visit from your friend when she travels to NZ. We are easy to find, but she is welcome to email us if she needs directions to where we are!