Planters with fancy ruffles!

Last week I made earthenware planters whilst waiting for the white stoneware bottles and vases to dry that I had made the week before. It was a nice change making the planters as they are on a fairly large scale, with about 6 kg of clay being used for each one. This is quite a step up from the 400 - 800 gm weights that I often work with when making domestic ware.
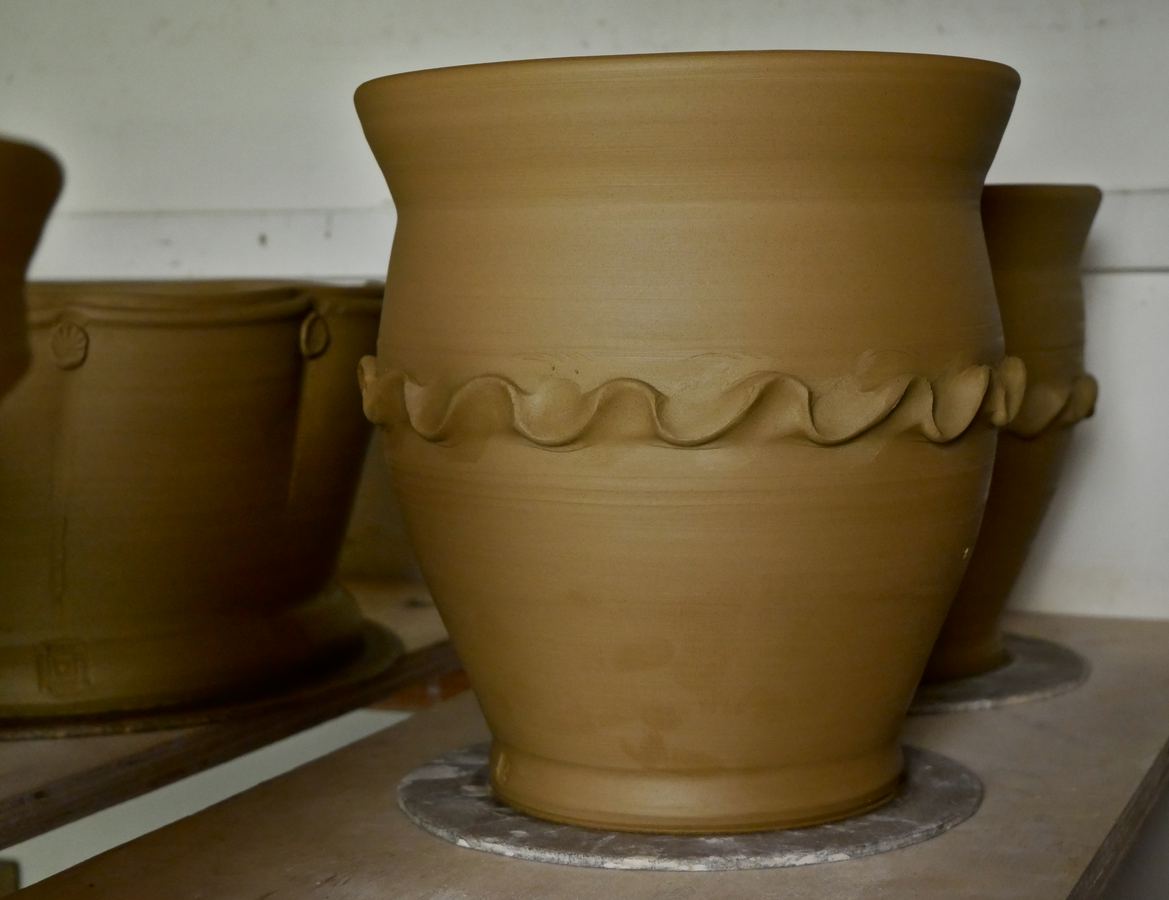
I found it most efficient to weigh out 2.5 kg of clay to form the approximately 11 inch diameter base of these planters. Weighing the base material and forming it first ensured that I got the thickness consistent each time. I centred the 2.5 kg ball of clay on the wheel and then levelled it so it was nice and even and well compressed. Then I added a coil of clay around the base and use this to form the lower part of the planter wall. Once I had pulled this up on the potter's wheel I added another coil and pulled that up to about 1.5 inches short of the final height, and then used one more coil to finish off, ensuring that I left enough material at the top to split it and form a decorative doubled rim. I checked the diameter of the planter when I got to the top and found that this design worked best when it was about 14 inches. Gently flaring the planter outward gave enough material to form the ruffled sides. I used a length of half inch dowel to assist with forming the folds up the side of the planter.
I put a pea sized bead of clay in each fold near the top and used a decorative clay stamp to give it a bit more personality!
 |
| I made 7 planters like these. |
 |
| These were the very first of the planters and there is more variation between them than the later ones, because I was experimenting and trying to solve some technical challenges! |
As these are terracotta planters for the garden they each have a drainage hole in the centre of the base. I made sure that I finished around the edge of the hole carefully and compressed the clay well there. I always worry about the hole being a trigger point for drying cracks, so it pays to be a tidy worker and do things thoughtfully!
Two days after making the planters I was able to flip them upside down and remove the throwing bat from the base and tidy the planters up underneath. The planters then were dried for anther two days the right way up before they were firm enough to turn upside down so they can do most of the remainder of their drying with their bases uppermost.
The planters will take two to three weeks to dry. I am hoping to assist with this a little later on by putting them on wire racks in the kiln shed with my electric kilns.

On my last day of making planters I made these smaller ones out of about 3 kg of clay.
The planters will be unglazed and their fired colour will be a rich brick red that should look very nice with plants in the garden.

Comments
And a big THANK YOU! You have provided ainspiration for using up a terra cotta body I don't like for my usual majolica!
Coil and throw is a perfectly acceptable method.. should be easier on the body too
Planters are fun... and it is nice not having to glaze them! I'm glad that these were an inspiration and, hopefully, you'll be posting some photos of your planters on your blog too!
Hi Gwynneth,
Some of the planters were a commission, but we may get to keep one or two and Laura will provide great teamwork in extending her garden into them I have no doubt!
Coil and throw is wonderful and does open up all sorts of possibilities. It is a bit slow, but I use a kick wheel most of the time anyway, and it suits that way of working very well.
Thank you for your "Thank You"! I am so pleased that you enjoyed visiting and looking at the studio, it is makes us happy to be able to show people around!
Kind Regards to you from us both.