Wood fired April Part One! A rebuilt firebox (again) and a long, hot firing!
Ha, short titles aren't my thing!
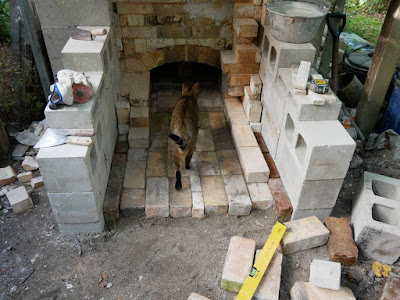
We will start with a 4 legged building inspector examining the beginnings of a new firebox!
The really great thing about simplifying the firebox was that loading the kiln was very easy and pleasant to do as there was nothing in the way!
There is room enough for two stacks of shelves inside the kiln chamber (you are only really seeing the front stack in this photo).
There is also a very interesting place at the back of the firebox that we are experimenting with for a few pots to be blasted by flame and liberally dusted by ash throughout the firing.
The roof of the firebox is made with three small kiln shelves, topped with a "sandwich" of ceramic fibre blanket, insulating firebricks, more ceramic fibre and a sheet of roofing iron. It can be put together quickly, and easily taken down and stored after the firing.
I made the firebox door from ceramic fibre blanket and two old steel mesh shelves that came out of a fridge at our local grocery store. This was suspended with stainless steel cable that ran through pulleys to a counterweight that was made from part of a heavy roof rack that a friend had cut up for scrap steel.
The door could be opened by simply pulling down on the counterweight. By good fortune, rather than clever engineering, the device was balanced enough to allow the door to be left in any position that was desired, so it was possible to fully close it or leave it partly open so as to allow the fire to take in more air that way.
The fire had many moods, from a happy crackling camp fire in the early part of the firing.
To neurotic and unco-operative! Here "doctor" Jim peers at the pyrometer reading whilst carefully working to clear a blockage of embers that was restricting the flow of air to where it was vitally needed. Becky and Laura cheerfully gather more wood to replenish the pile near the kiln!
Here are cones from the coolest part of the kiln. Nearest is cone 4, then the three cones behind it are, cone 10 standing with a slight bend, cone 8 flat, and cone 6 starting to form a puddle at its tip where it had flopped onto the kiln shelf. It is never quite straight forward to interpret cones, as temperature and the time taken to reach that temperature both have a bearing on when the cones bend, but I would think that 1260 C (2300 F) is a reasonable guess from what we see here.
In the lower and hotter part of the kiln, cones 6 to 10 were all flat and cone 11 (not shown) was down. It is probable that a temperature of about 1300 C (2372 F) was achieved.
We fired for 12 and a half hours, and the kiln took 3 days to cool before it could be unloaded.
As this blog post is already rather long I will do a Part 2 showing the new work from the firing!
Here is a quick glimpse of the pots that were in the first stack nearest the door of the kiln.


Comments
Making the kiln easier to pack, and the firebox door on a pulley...great ideas to make life easier on a potter's body!
Yes,this kiln is progressing towards convenience, what with pulleys and so forth! Others lending a hand with firing has been a great thing too, it makes almost impossible quite do-able after all!